Kitchen Renovation

Kitchen Renovation

We got a little carried away with our master bedroom renovation and wound up doing our kitchen as well. Unlike most people we love remodeling and don’t ever want it to stop. We kept our contractor there much longer than originally planned as we kept finding more to do (bleach and seal the exterior of the house, fix all the windows, install new gutters, build a craft room…). When we started ripping things out for our master bedroom and saw the old cabinets leave the pantry and bath we couldn’t wait to tear out the kitchen. We have a nice amount of space in our kitchen but mostly the countertops on the side wall were a dumping ground for people’s clutter and all the prep was done on this flimsy little island we bought as a temporary cutting block when we moved in (nearly 12 years ago…). We started thinking about the idea of using all freestanding cabinets to give it an antique feel. The only area I couldn’t figure out for that was the corner which housed the sink and dishwasher so we wound up doing a fusion of free standing and built in.

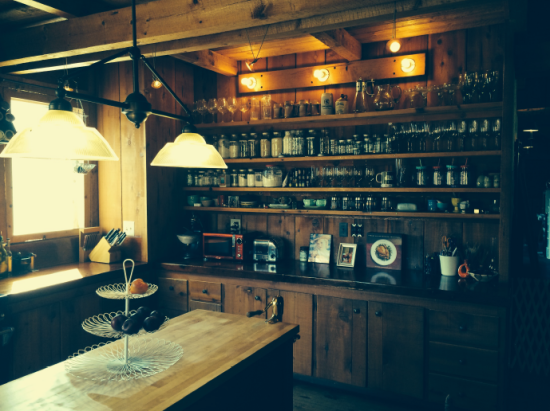
For the open wall which had cabinets and open shelving we ordered a huge sideboard and hutch with mesh grating in the upper doors so you can see the shelves.


This eliminated the counter that seemed to be the biggest clutter trap and was never used for cooking. The bottom of the cabinet is nice and wide and holds all our large appliances including the (plugged in and ready to use) microwave so its out of sight completely.

img_1377 
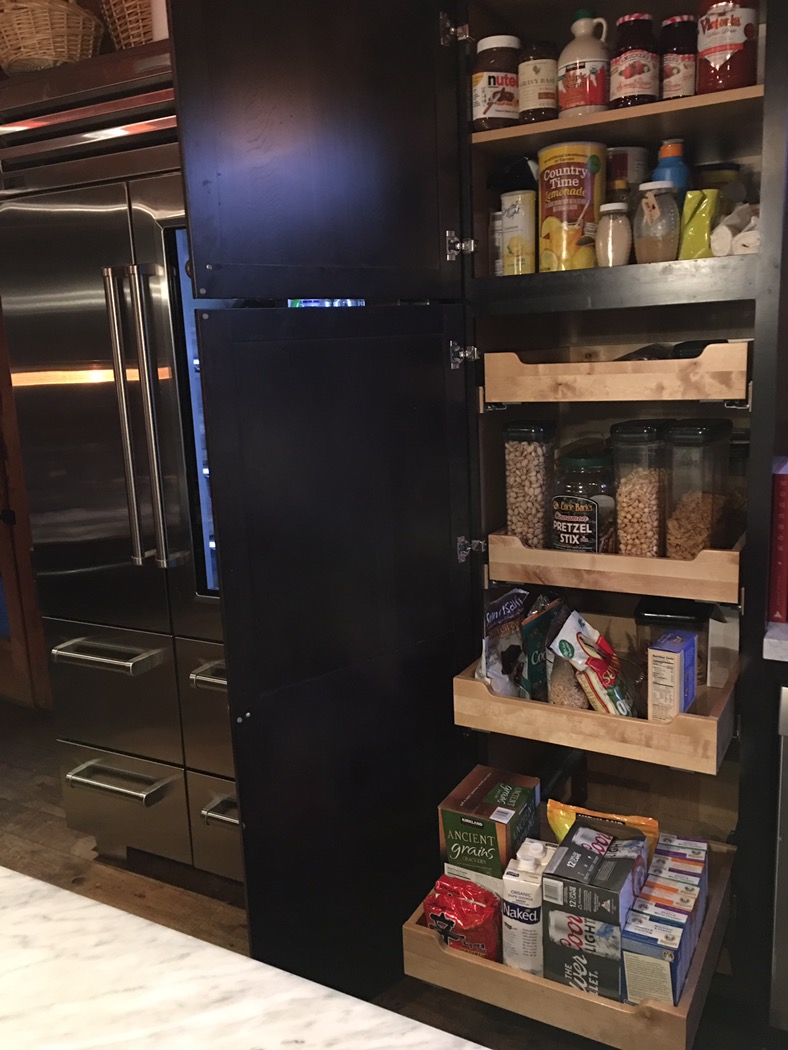
The upper section is where we keep our glassware and pantry items.


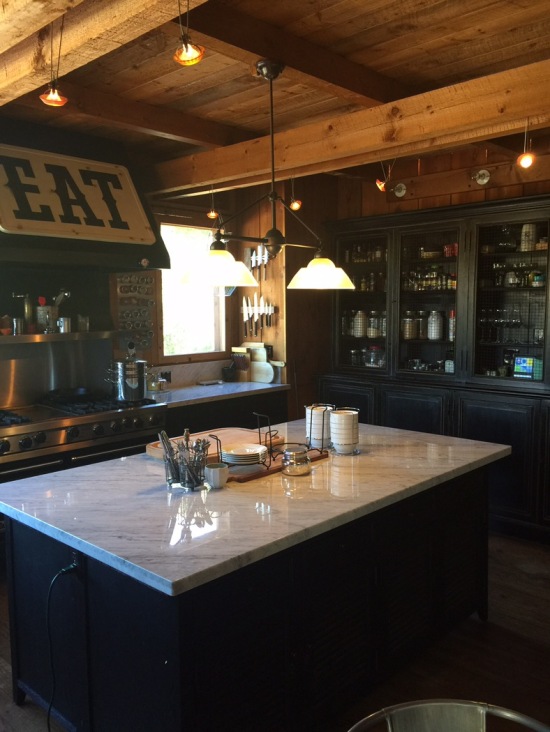
For the island I found two sideboards that matched our bathroom vanities and came to the exact right height for kitchen cabinets. We placed them back to back and installed a huge slab of carrera marble on top. I’ve always wanted a marble island for rolling out dough!


Our contractor added power to each side so whenever we use appliances we just pull them from the hutch and stick them on the island. It’s a one pivot operation and the appliances stay out of sight when not in use. We purchased these spice racks from IKEA and stained them black to mount to the side to hold cookbooks.


For the built in section we went with Kraftmaid cabinets in a coordinating black antique finish. We ordered them from a company in Kentucky that offered wholesale pricing. I sent our floor plan and dimensions and worked with a kitchen designer to set up the right configuration.  We went with a large pantry cabinet:

and stainless farm sink:

with deep drawers and spice pantry pulls on either side of the range:img_1371

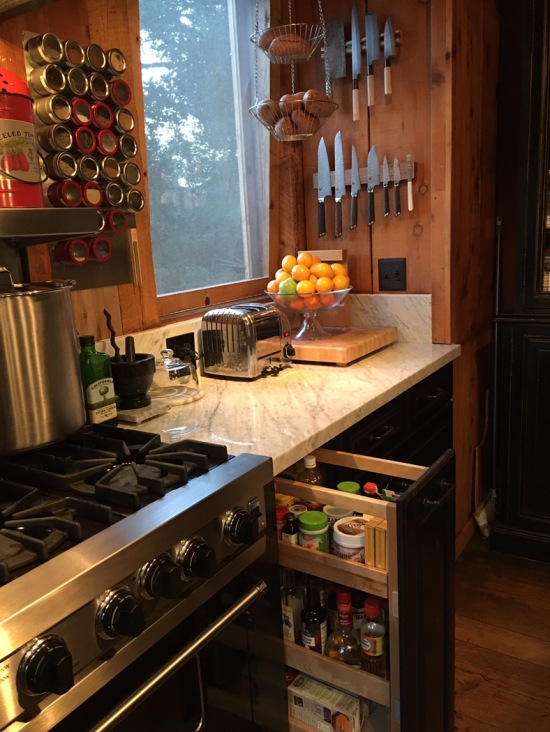
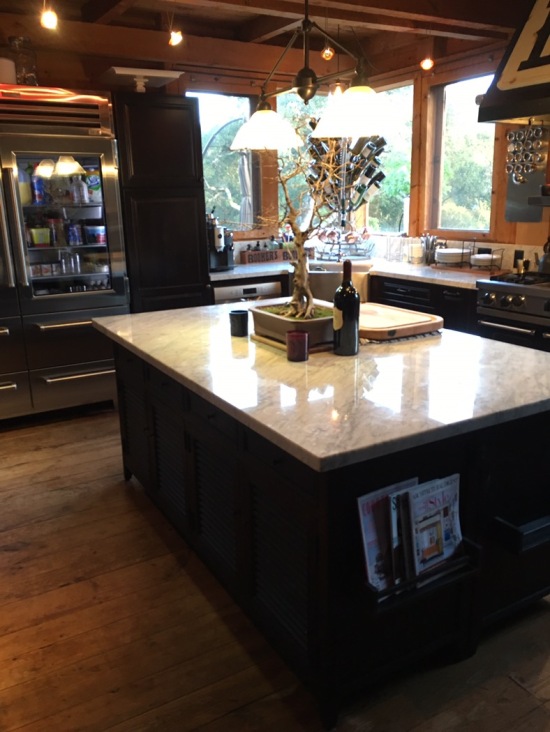
 The original thought was to do a different countertop on the built in section but once we saw the marble in our kitchen we loved it so much we immediately ordered a second slab from the same batch.

Now a word about the marble as that’s one area I didn’t fully understand regarding options. We wound up with a high gloss polished finish which originally looked like a mirror but now tells the story of our lives right on the surface. At first I was on hyper alert about scratches and water marks and had coasters everywhere however, that proved to be futile very quickly. Now we just go with it and it’s stopped bothering me (really, I never repeatedly and obsessively polish and clean the counters to try to get them shiny again… ever!). The counters have become etched from use and I rarely notice it. It’s sort of like streaky windows, you only see the streaks at sunset when the light hits it at the right angle (or you have company over). At some point in time though I will get the fabricator back to hone the counters and do a matte finish which is what we should have done from square one. Every time I walk into the kitchen and see that gorgeous marble though I smile! Side story: Dan and I met at Il Fornaio in Palo Alto, I was a hostess and he had been a bar tender there previously so was in visiting. There’s (matte) marble EVERYWHERE there, and it all gets used and abused and continues to look better with age. So the marble also brings us back to our early courting days, aw!

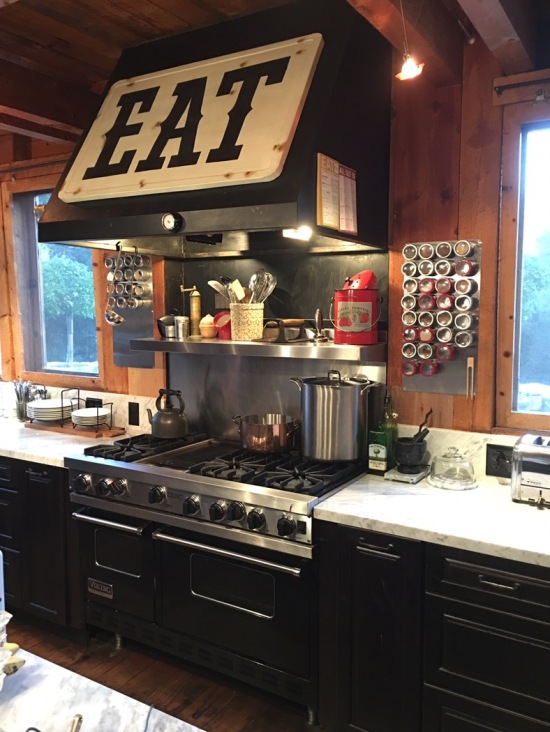
We found a black Viking range for sale from a culinary school that was closing. It had barely been turned on as it was part of an un-utilized  demo kitchen item so was in perfect shape and quite the bargain. It’s a residential range so properly insulated (unlike the commercial 1973 Wolfe range that was here before which and was leaking propane and nearly burned the house down).

img_1373-1 
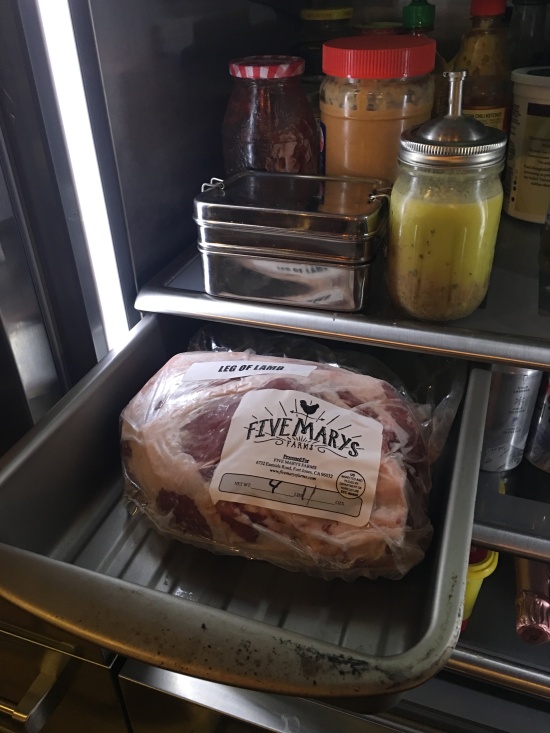
The refrigerator is a sub zero which we got as a floor model. It’s very industrial with all stainless drawers inside and I love the glass door. It does make you keep your fridge clean but that’s a good goal anyhow.

You can actually store, marinate and cook meat in these drawers!

IMG_1426

The farm sink in stainless is fabulous as it has a hint of rustic style yet feels like a restaurant too which is exactly the look we were going for. The pull down faucet is commercial and fantastic for rinsing everything.

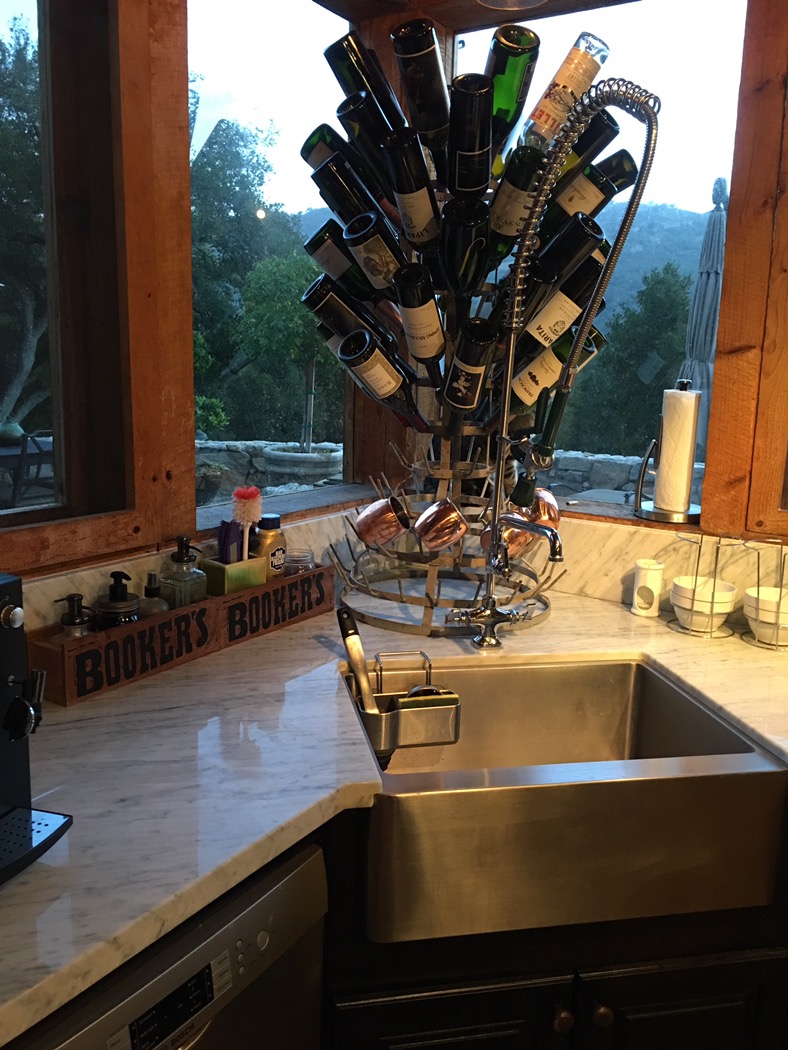
We keep the essential appliances that we use daily out which for us are the espresso machine and toaster. We have a couple cutting boards for work areas and like to do a seasonal display on the island (currently our bonsai tree which can’t be outside in the frost). The plates and utensils are out in racks for easy access. Behind the sink we have an antique French bottle rack on display and two Bookers Bourbon crates hold the soaps and brushes.

The real workhorse is the island and we all love having a huge one now!

Here are some before and after shots because those are always fun:

BEFORE: rustic

Screenshot 2016-01-15 17.59.19

AFTER: polished

img_0115

BEFORE: dated

Screenshot 2016-01-15 17.58.26

AFTER: fresh!

img_1384

BEFORE: dangerous uninsulated leaking propane and inoperable range

Screenshot 2016-01-15 17.59.03

AFTER: lovely safe and working range!

img_1367

Master Bedroom Renovation

Master Bedroom Renovation

I’m going to do a series of posts on our home renovations. We’ve owned four different homes and done a lot of work on all of them. The first three we fixed and flipped which enabled us to keep moving up. When we bought our current home our family was growing and decided to stay put and raise our kids. In the beginning it was all DIY and now we do some jobs and hire some out. We do all the design work though.

First project to post: Master Bedroom

We purchased this country home in 2004 from a builder who was an avid hunter and homesteader. While it was very impressive and full of rustic materials it was lacking in a few creature comforts some of us less rugged types are accustomed to (dishwasher, central heat). One such feature was a master suite. Our bedroom was upstairs with two other bedrooms and all three shared a bathroom. Downstairs was a large office, full bathroom and laundry room/pantry. Initially we were fine with that layout since we just had Zach who was a toddler and one on the way. Keeping the kids close was natural and sharing a bathroom wasn’t relevant as we were still in the diaper stages. Eventually though when we had a teen, tween, preschooler and a fourth one on the way I became pretty adamant about having a sanctuary all our own. We evaluated all the options. Go up, down, out, over, add a prefabricated addition, put up a yurt and build a tunnel to it, find an old church or barn to reconstruct in our driveway…. Seriously we were extensive. I downloaded some floor plan apps and utilized my pregnancy induced insomnia time to pour over houzz, Pinterest and the www and apply the ideas to our floor plan. One day looking over the current layout for the millionth time it clicked. Why are we using ALL this space for an office, guest bath and pantry and cramming everyone into one level upstairs??? All we need for a guest bath is a half bathroom. I started knocking down the walls on my floor planning app and what was left was a huge space that was poorly utilized currently and just right for our master bedroom! It’s funny how the answers are staring you straight in the face sometimes.

Zach took over our room, Scarlet took over his room and Frankie who had been in with us moved into Scarlet’s old room so the kids are all upstairs. Alexis is now sharing a room with Frankie (at least her things are).

We moved all our pantry items into a sideboard in the kitchen which made baking much simpler. We relocated the laundry area to another under utilized space, the landing upstairs. This made perfect sense as it’s the central area between all the kid’s rooms so the epicenter of dirty laundry.

img_0221
The rolling carts separate lights and darks and roll right up to the washer for easy loading. The stainless table is mounted to the railing on a hinge so can fold flush, and hanging clothes dry on wooden hangers on the valet hook above.

The pull out shelves hold milk crates for easy storing. One per child, one for towels and one for outgrown clothes to store, pass on or donate. It’s based loosely off the family closet idea. It’s basically a holding station so I can fold right out of the dryer (either on the folding table or in the air) and sort directly into the milk crates. When they are full it’s time to send them to their respective owner for unloading into their closet. It’s a great system!

This opened up room for a walk in closet, open concept master bedroom and bathroom. Once we had the space allocated it came down to design and layout. Having travelled a lot I based the flow off a well designed hotel room. It was our sanctuary so not necessary to close off the bathroom (although the space is there if someone wanted to add a wall someday). When we bought our first house my parents gave us an amazing anniversary edition red  Kohler claw foot bath tub that has travelled with us to every home but never quite fit. Finally it had a place to take center stage. I placed it by the window so you could see the view, fireplace and television while soaking. We ordered a shower conversion so that bathing or showering would be an option.


There is a bump out where the tiny half bath sits on the other side of the hallway and this was designed to exactly fit a double vanity which we purchased from Restoration Hardware. All the lighting and medicine cabinets came from there as well.


The toilet is in the corner behind the tub. We debated walling it off but chose to divide it with a tall open book shelf. This serves two purposes, to create a screen and to hold towels and toiletries. A wall could always be added here someday.  

 At the end of the bathroom there is an open doorway to the walk in closet. It has a his and hers side set up with an easy closet solution. My husband has a “thing” for shoes and sweaters I know. We are working on it, it could be worse!  

For the bedroom side we used the existing bookshelves to house the television and left the gun safe as is. The open wall holds a King sized bed perfectly. I have some wall mount shelves waiting to be installed (on the honey do list) directly on the bed frame for water glasses, remotes etc.

  
The tiny hall guest bath is one of our favorite rooms. It’s so quaint! It was a little tricky finding a sink to fit and we went through a couple trials before finding this sliding barn door but it turned out great in the end!


We finished with the rooms JUST in time for Alexis’s birth and it made me a happy mama to have this beautiful space to nest in. It’s not exactly the adult sanctuary I had imagined since the kids love it as much as we do. Taking a bath in the big tub by the fireplace with cartoons (or cooking shows for Scarlet) is tough to beat.


But we don’t mind sharing our space, most of the time. And keeping in the theme of hotels I have these great signs given to me by Dan for when we do!